
Have you heard of inline editing before? In case you didn’t know yet, inline editing is an advanced technology that is the preferred UX for most applications designed for users. It’s made for users who wish to make, engage, inform, and convert contents online.
Are you trying to build or upgrade your products to transform the market? Perhaps you wish to lead the next era of transformative technologies. If that’s the case, you need to think about the ideal ways for your loyal users to engage with it.
In today’s post, allow us to enlighten you about everything you need to know about HTML Inline editor. We will offer you practical details on creating an inline editor to your apps with a few introductory lines of code. Are you getting excited?
Now, without further ado, let’s jump in!
Introducing Inline Editing
In addition to the definition earlier, inline editing enables users to edit content showed in HTML pages straight without needing to switch between a view mode and an edit mode.
Mostly, your users could edit more than merely the text. In fact, they are given with a toolbar and menu that enables them to format the content at the same time. Inline editing is often utilized in email marketing purposes. You see, it allows the users to determine how their content will appear while they are creating it. Isn’t it awesome?
How to get started and use the inline editor in your applications
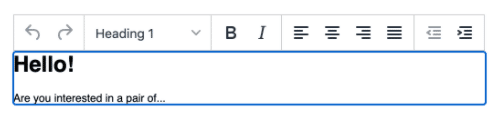
Perhaps you already have an HTML page you wish to include inline editing to. Allow us to begin with a raw HTML file with a single div with a paragraph and a heading for this post.
<!DOCTYPE html>
<html lang="en">
  <head>
    <meta charset="utf-8">
    <meta name="viewport" content="width=device-width, initial-scale=1">
  </head>
  <body>
    <div id="mydiv" style="margin: 50px">
      <h1>Hello!</h1>
      <p>Are you interested in a pair of...</p>
    <div>
  </body>
</html>
Include the inline editor
The next thing you need to do is to import and initialize the HTML Editor on the page. You can do that by adding these foods in the head section <head>…</head> of the file. Change no-api-key along with your Tiny API key.
In case you still don’t have a Tiny API key, you can still have one today.
<script src="https://cdn.tiny.cloud/1/no-api-key/tinymce/5/tinymce.min.js" referrerpolicy="origin"></script>
<script>
  tinymce.init({
    selector: "#mydiv",
    inline: true,
    menubar: false
  });
</script>
Keep in mind that TinyMCE is 100% customizable and flexible at the same time. Hence, you will find a plethora of configuration choices you could throw at it at this point. What can you do to keep everything accessible for now?
In that case, we have deleted the menu bar by setting it to false. Bear in mind that the value we have presented for the selector equates the id of the div, which we wish to prepare the editor on.
On top of that, inline editing could be only run on a div even though TinyMCE could generally be run on any element. Hence, you might need to include on to your HTML editor if you still don’t have one.
Make sure you refresh the browser and click on the text after you have made such modifications. You can then edit the text, and that’s where the toolbar will show, offering you more formatting choices, as well.
Remember that you will be provided with a warning alert: This domain is not registered with Tiny Cloud. You will come across that notification is you’re running your TinyMCE on the local machine outside of a web server. You can also encounter that if your domain on which you initialize TinyMCE isn’t certified over your account.
You will find simple steps to get rid of that notification. Simply open it on localhost that is approved domain by default already. You can then register your domain as an approved domain in the account.
How to customize your toolbar?
Did you know that TinyMCe is loaded with many choices you can include and get rid of as necessary? For instance, you like a few options, such as selecting color, italics, bold, style, and get rid of formatting.
You can do that if you will override the default toolbar configuration as shown below.
tinymce.init({
  selector: "#mydiv",
  inline: true,
  menubar: false,
  toolbar: "styleselect | bold italic forecolor | removeformat"
});
On the other hand, you might wish to configure it with more options. If that’s the case, please check out and read our post on how to customize the toolbar of TinyMCE for further details on configuring it for your app.
How about quickbars?
You will find some scenarios that you might wish to emulate the Medium experience. That’s where the toolbar appears after you have highlighted a few texts.
Our team referred to it as quickbars. It is included through configuring the quickbars plugin as well as its corresponding toolbar options. A good example of this is:
tinymce.init({
  selector: "#mydiv",
  inline: true,
  quickbars_selection_toolbar:
    "styleselect | bold italic forecolor | removeformat",
  quickbars_insert_toolbar: false,
  menubar: false,
  toolbar: false
});

How to improve your email marketing software?
Are you planning to advance or creating your email marketing products to remain competitive in your market? Fortunately, you will find a plethora of tips and tricks on the related article. It will be advantageous, especially if you wish to offer your users the most flawless content creation experience.
What to do next?
You have even more choices for modifying your UX/UX of your app to be the best version it could be. Here are some of them:
- Include premium features like accessibility checking, link checking, and enterprise spell checking. All of that is accessible with our Cloud Professional plan.
- Include options to add images, links, and other media.
- Modify the toolbar icons and skin to complement the design system. You can pick our premium package of icons or skins, or you can create your own with the help of our skin tool.
- Ultimately, you can visit our detailed Tiny documentation for further configuration details.
There you have it! Are you now ready to start your inline editing project?