While an expensive camera equipped with the latest features and technology may provide you with stunning photographs, it doesn’t mean that there aren’t any limitations to what it can do with the environment you are shooting in. If you are new to the camera, new to shooting photography, or have no formal training in photography, these can also manifest as limitations. This means that you will have a lot of post-processing to do in order to get the image you imagined. One of these post-processing adjustments is color correction, which is simply the task of correcting the colors to make them as accurate as possible to their true nature. It is a crucial part of the post-processing production as the camera doesn’t always capture the hues as vividly as possible. For instance, a blue sky could easily come out purple or reds can look dull due to bad lighting.
Way One: Using a 3-step Adjustment Process in Lightroom!
Lightroom’s simple and intuitive design makes colour correction a breeze, and doable in only a few short steps. Lightroom uses a much more hands-on approach but takes care of a lot of the work for you.
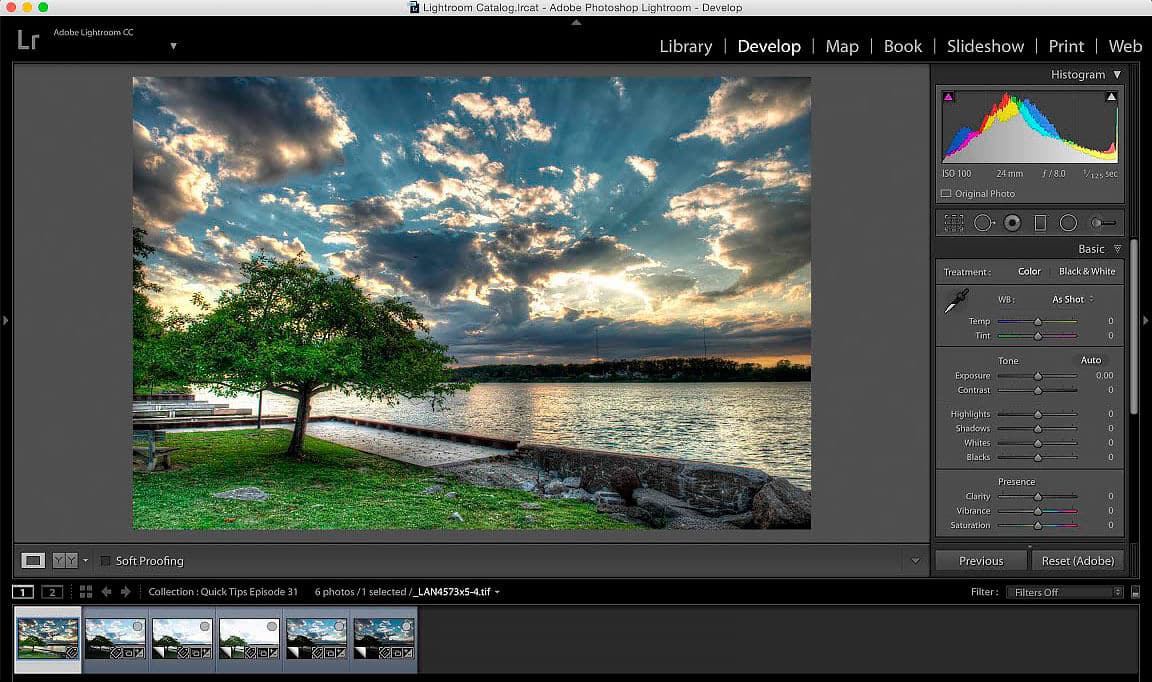
- Start With the Whites. Under the ‘Develop’ tab, enter the ‘Basic’ panel and choose the White Balance Selector. Deselect that Auto Dismiss checkbox and click an area of the image that should be a neutral grey in colour. This will open up the adjustment interface, allowing you to remove any unwanted colour in that section of the image.
- Continue With the Colours. Below the ‘Basic’ Panel is the ‘HSL’ Panel, which is used to adjust colour saturation. If any colours in your image are too vibrant, or not vibrant enough, select the Targeted Adjustment Tool, click the area you want to adjust, and drag up or down to increase or decrease saturation, respectively.
- Last is the Lights. Finally, the ‘HSL’ panel also contains the ‘Luminance’ panel, which allows you to adjust the brightness of an area using the same Targeted Adjustment Tool. Some areas may need both saturation and lighting adjustment in order to get a desired result.
Way Two: Adjusting Colors Quickly With Photoshop’s Auto Presets!
In every photo editor, there are multiple ways or techniques you can use to adjust the colors and Photoshop is no exception. If you want to adjust the colors quickly in Photoshop, use the curves layer technique which is as follows.
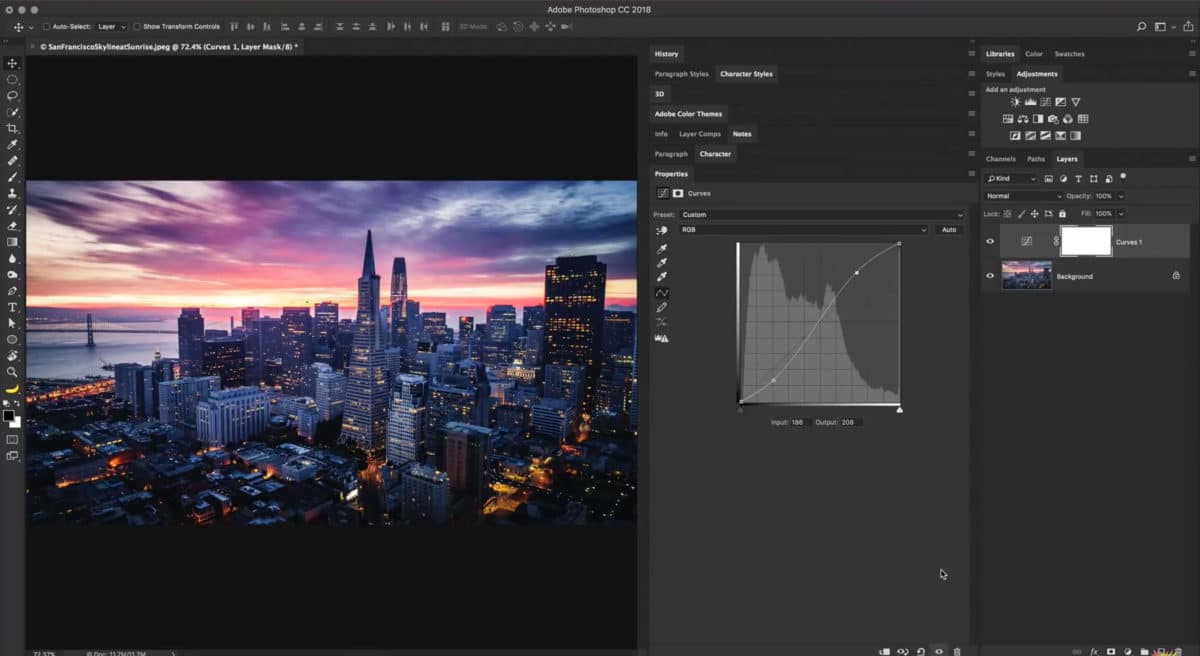
- With Photoshop open and your image loaded in, pull up the Curves adjustment layer option. In the top corner of the tool, there will be an “auto” button. Click it. What this does is it adjusts the contracts of the photo instead of balancing out the whites within the photo. This gets you the quickest color adjustment in just a few clicks. If you find that it is not enough, you can always tweak it by holding down the ALT/Option key to bring up the auto color correct options.
- With the auto color correct options, you can choose between four different algorithms, with the Enhance Brightness and Contrast being the default. Choose the Find Dark and Light Colors and check the Snap Neutral Midtones and hit save as.
- Another way of doing this would be to use the Levels tool in combination with the Color Picker tool, but this process requires nine steps that has you adjusting and entering new values for the RGB color scale. It also requires you to add in new adjustment layers in order to find the whitest and darkest spots of the image. This method is better for individuals who have a more in-depth knowledge of the program.
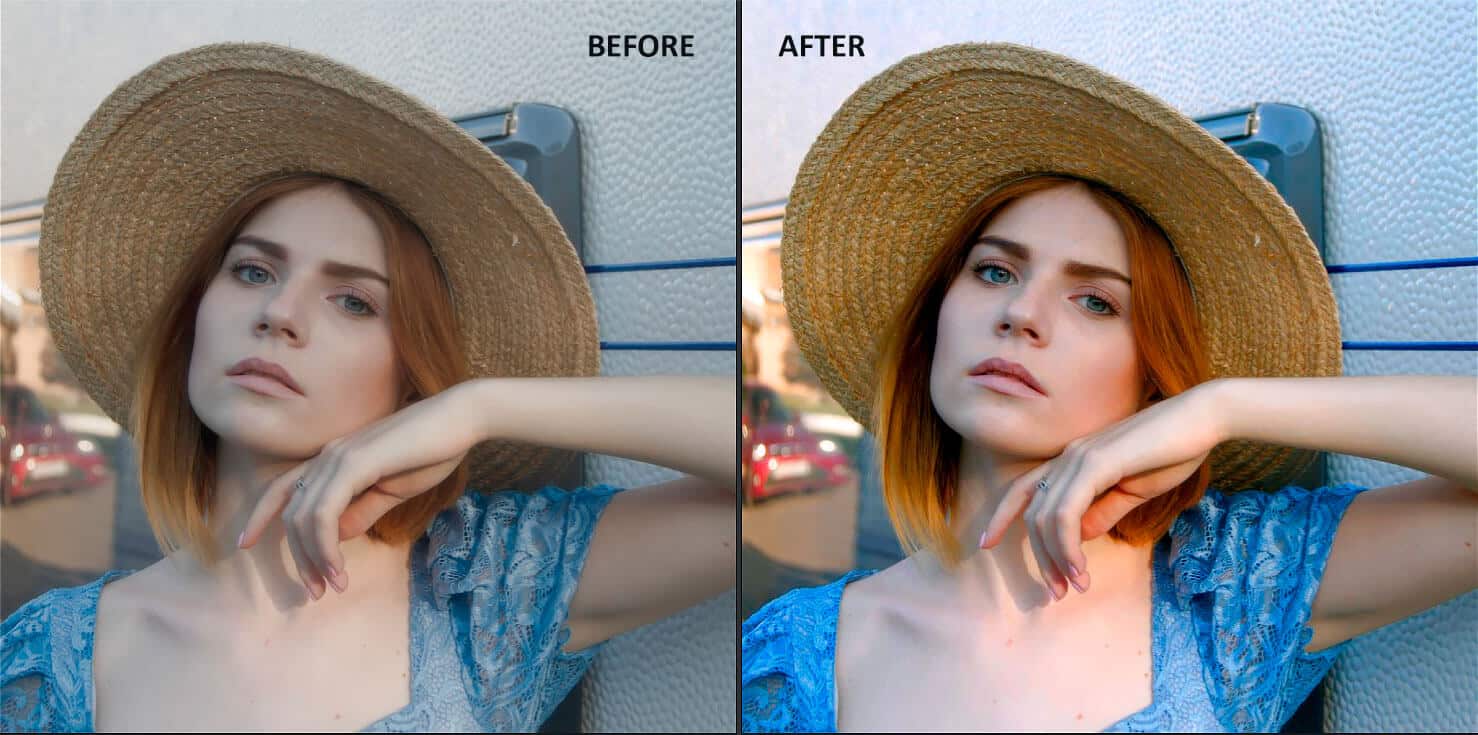
Way Three: Using Auto Correct & Sliders to Adjust Color with PhotoWorks!
If you want to know how to color correct photos in PhotoWorks, an intelligent photo editor that allows you to make drastic changes with just a few clicks, there are generally three ways you can do it.
- Use the Autocorrect Feature. If your entire photo is too white or too dark, you can automatically saturate these colors to bring more light into the picture with a simple click. On the enhancement tab, simply find the auto correction section and check mark the color box. If you also have a lighting issue, also check mark the light box and the exposure, contrast, shadows, and highlights will be automatically adjusted.
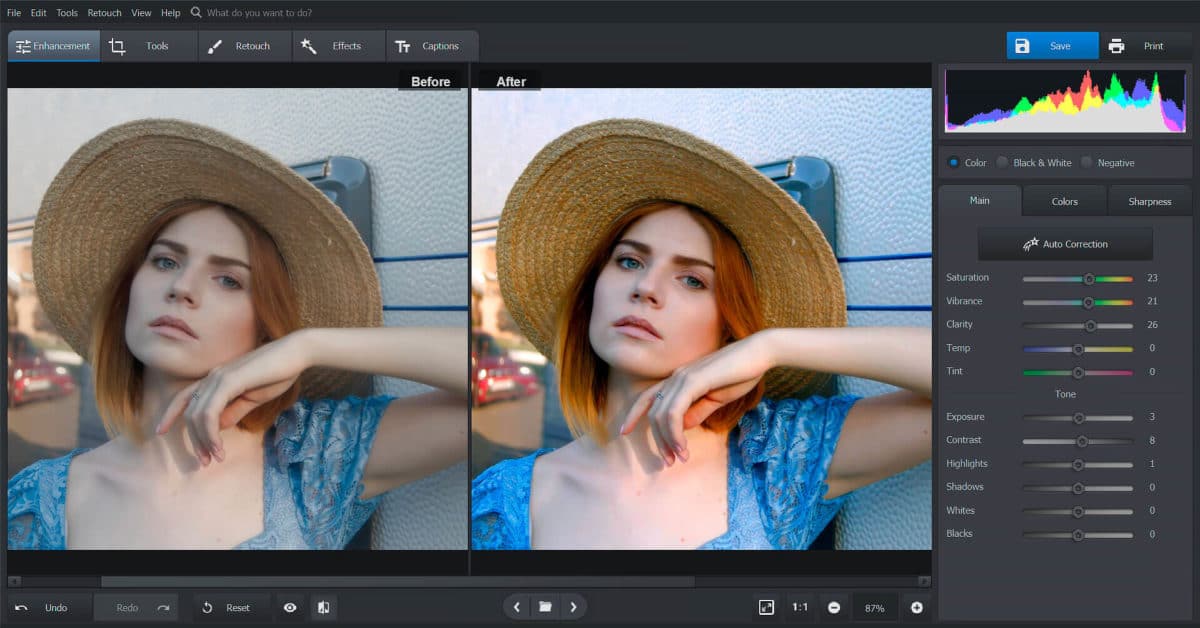
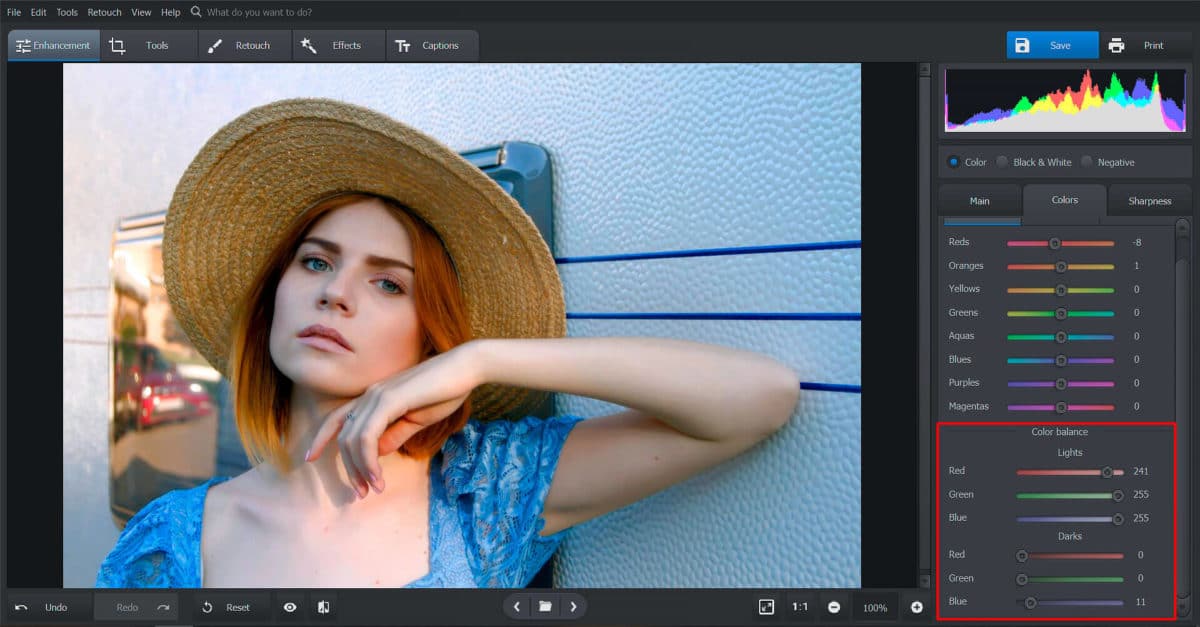
- Use Manual Slider Adjustments. If your image only has a few specific parts of it where the color isn’t quite right, you can manually adjust these areas with the slider options. This allows you to fix up the tone of the image by switching up the warm and cold color ranges. Head over to the colors tab within the enhancement section and move the sliders within the color balance section (you may need to scroll down a bit to find it). Slide the red, green, and blue sliders on either the light or the dark panel to lighten or darken the colors.
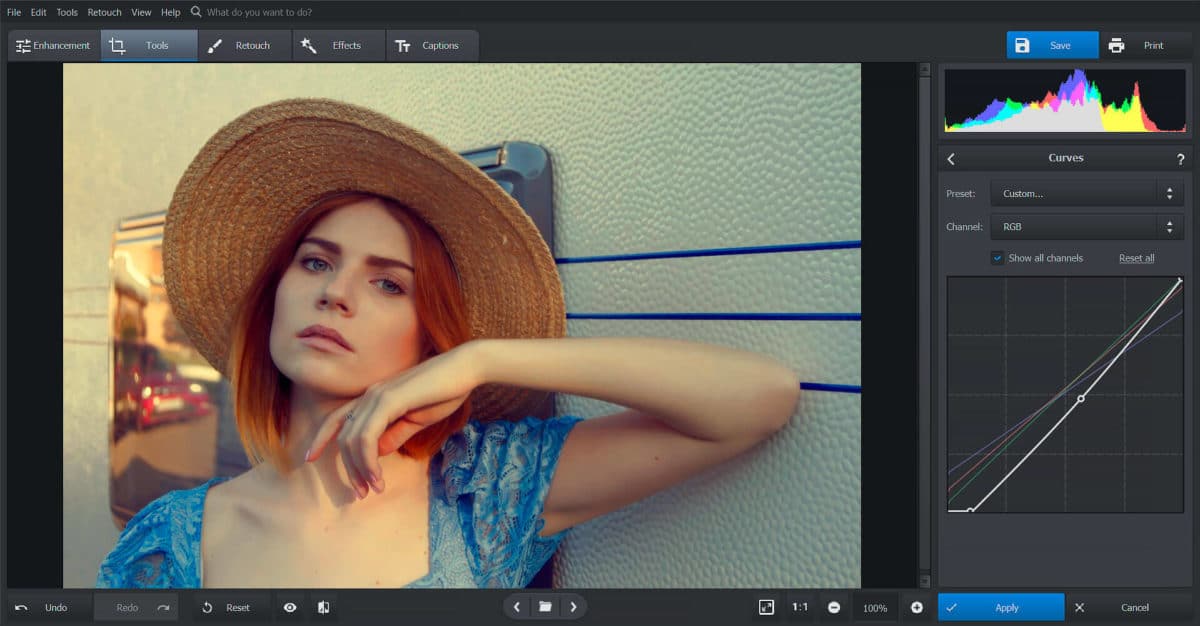
- Fine-Tune the Color with Tone Curves. If manually adjusting the colors is too much and you need a more subtle way of getting the job done, you can use the Tone Curves tool to manually adjust the lightness and darkness of chosen tone areas like: highlights, shadows, midtones, and black/white points. With the Curves tool, you’ll be dragging the curve line down or up, depending on whether you want a warmer or colder tone. This method does require a little more knowledge on how to adjust tinges, as images can come out less than ideal if not done correctly.
Wrapping It Up: Which Way is the Easiest?
While Photoshop and Lightroom are fantastic tools for editing and correcting images, they either require a more hands-on approach or in-depth knowledge on how to use the tools. With PhotoWorks, the color adjustment attunement is easy to learn and because the user-interface is easy to navigate, beginners could jump right in and get an image to come out perfectly. If you have a photo that needs color correcting, definitely check out PhotoWorks free demo.