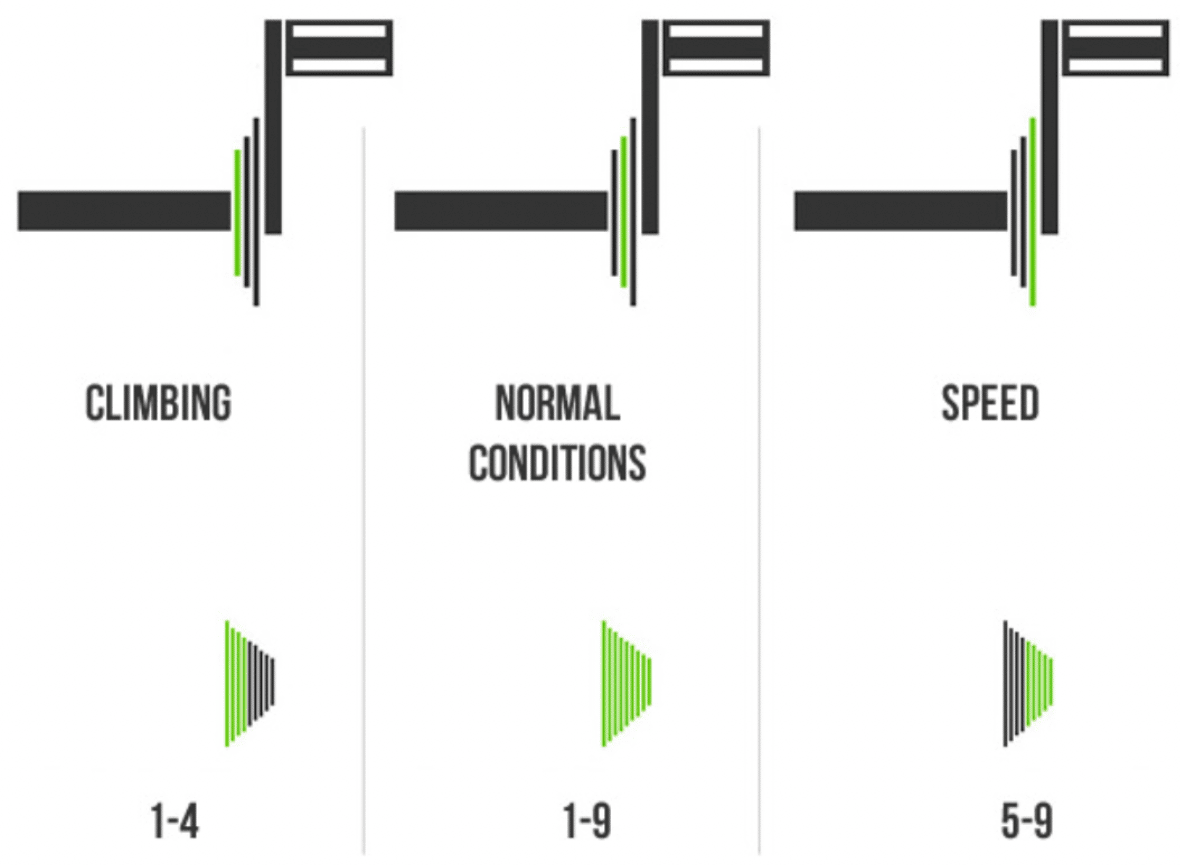
Lots of cyclists, not just beginners, have been seen to make a mess out of their chain positioning on the chainrings and sprockets. Hopefully this article can help you understand how to use your bike’s gears correctly. When you purchase a new bike then these instructions on how to change gears do come with it but just to make sure you understand 100 percent here are some diagrams and descriptions to help you. In these diagrams you’ll see the chainring is attached to the right side crank arm and then the sprocket is behind, on the rear hub.
That’s some pretty basic information above and you probably would’ve figured it out on your own as you ride your bike. The next piece of advice is pretty easy to remember as well and that is to never use the smallest chainring together with the smallest sprocket and the same vice versa for the largest chainring and largest sprocket. You can achieve around the same ratio when you’re using both the medium chainring and sprocket together.
Advice for gear shifting
When you’re out riding, always try and analyse the terrain in front of you so that you are able to pick out which gear you’re going to need before you’re there. For example if you’re approaching a hill or steep incline and forget to change before you’ll be in a very heavy gear while you’re going at slow speeds. So when you finally decide to change to a lighter gear the whole transmission will be under a heavy load and it may start to wear and tear and could even be at risk of breaking your chain. One way to tell if your chain is being damaged is just to listen, if you hear a terrible sound coming from the transmission when you’re shifting through gears then it may be worth having a look at.
Another thing you can try and remember while you’re switching gears is to pedal a little softer so there is not as much force being exerted onto the transmission, this can greatly help your chain move on the chainrings and sprockets and could even prolong the life of your chain.
One component that plays a big role in the transmission are the derailleurs because these are what guide the chain to the correct spot so it is very important that you make sure that these are perfectly in their place so that nothing goes wrong. Beware of changing gears too fast as well because if you change more than one at once then it could cause the whole chain to get stuck and could cause you to fall or just snap the chain.
When you’re riding it is quite normal to feel your chain drop from the chainring in the front or sprockets, to counter this is pretty easy you’ll just need to shift gears in the opposite direction in which it fell and it should recover itself with a bit of light pedalling. This can be pretty dangerous and may even damage your frame’s paintwork if it gets stuck between the sprocket or chainrings and the bike’s frame, so you may have to help the chain out by gently helping it back onto the sprocket or chainring while gently pedalling.
What is gear ratio
If you want to figure out what your gear ratio is then you can actually do it by yourself by dividing the number of teeth that you have on your chainring but the number of teeth you have on your sprocket. Before you get sad, don’t worry you won’t need to count every tooth by hand, there should be a figure marked on the chain ring already and the same goes for the sprocket. So if you find the number 46 on the chainring and 11 on the sprocket then your gear ratio would be 46:11 which is the same thing as 4.18. This number represents exactly how many times the wheel rotates for one complete rotation of the foot.
So there you have it, a simple guide for you to learn how to safely switch gears without damaging your transmission.

